
In this post I’m going to go over how I tie my kayaks to our roof rack, I had some interesting experiences trying to figure out the best way to do this and I’ve seen that there many different ways to do it with either multiple straps, bungees or even just a throw-line. I chose the following method because it’s simple and quick to do, all it requires is a normal 2 bar roof rack which most people will have (pictured below) and a single longish strap or bit of rope. You can put a second boat on top of the first, cockpit-to-cockpit and still only use 1 strap to tie them both down. This allows you to get 4 boats (2 below, 2 on top) on a normal-sized car with only 2 straps unless you have a much longer strap (like a 10m throw-line) in which case you could tie all 4 boats down using just that; I like to use 2 bungee cords for each boat to make absolutely sure that they’re secure enough for a long road trip but realistically, if you have a strong strap/rope that’s unnecessary except as a precaution.

- The first thing to do is to make sure that your roof bars are securely attached to the car itself. I’ve found that our cheap Halfords roof bars are absolutely awful at this, the tighter you secure the boat to the roof rack the looser the bars become which kind of defeats the point of a secure boat-tying method considering the entire roof rack might just fly off the top of the car while you’re travelling at 70 (or faster) down the motorway. By buying a good roof rack to start off with (I’ve heard that Thule offer a few good options) you can forget about arriving at your destination only to realise that the M1s been blocked due to a kayak-related pile-up, instead you’ll only have to worry about your “multiple granny-knot” system coming undone causing the kayaks to come smashing through the windscreen of the car behind – unless of course you finish the rest of this post, in which case you can go and chase the rain…
- While it should be obvious to most I feel I still have to point that the straps you use are just as important as the roof rack itself. Your roof rack could be as solid as a rock, but if you’re using sewing thread to tie down your boats then it’s not realistic to expect any of them to stay put. Palm make some cleat straps but when I tried them they slipped really easily; I use some off-brand ratchet straps that work really well so shop around a bit, don’t just buy the first thing made by a known manufacturer because it might not be that good.
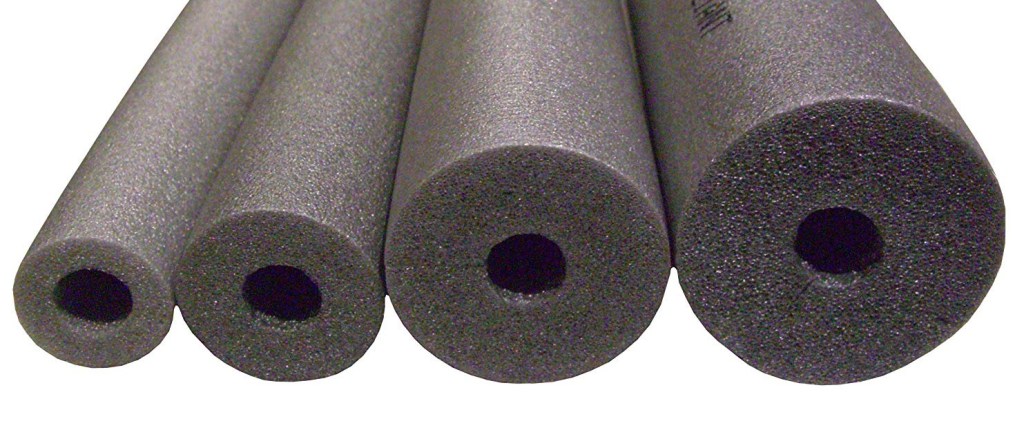
- While not particularly necessary, to make absolutely sure that the boats don’t slip on the roof bars having some sort of grip around them might be useful. I would recommend pipe-insulator as a very cheap and simple way of doing this, they stop the kayaks from sliding around and also prevent those irritating scratches and dents that we’ve all got when someone who was just a bit too enthusiastic when it came to tightening the straps.
Now that we’ve gone through preparing the roof rack I’ll explain what to do next (assuming that you’re tying a single kayak down) – this is pictured below.

Place the kayak right-way-up on the nearer side of your roof. Make sure that the front and back grab handles are in the same place in relation to your roof bars so that when you tighten your straps the boat is held down equally at both ends. Place the ratchet or buckle system in front of the front roof bar. Take the other end of the strap and thread it through the front grab handle.

The strap is now lying across the top of the front of the boat (going through the grab handle) with the ratchet on the nearest side and the rest of the strap on the other side. Using the end you just threaded through the grab handle, tuck it under the front roof bar and run it along under the rear roof bar, then repeat the same process on the back as was just done on the front.

The strap runs under the rear bar, pull it up and over the rear of the kayak, through the grab handle and back down onto the nearer side. Thread it under the back bar heading forward towards the front roof bar. Pull it under the front roof bar and bring it up to connect with the ratchet/buckle.
If you make sure the rope strap isn’t twisted and spreads even pressure around the boat it will be easier to tighten, more secure and less likely to move during transit. I like to add two bungee cords (available in any DIY store), one from the front grab handle to the front bar and one on the back as well that way even if the straps do fail the bungee should prevent the kayaks from colliding with anything behind you because they’ll stay attached to the car (hopefully giving you enough time to pull over and reflect as to which part of this post you didn’t read properly). This process can be repeated with another kayak on the other side of the roof rack. If you want to be adventurous and attach 4 kayaks, place the first kayak on the rack as just shown and then place the other cockpit-to-cockpit facing the opposite way; once they are joined together like this, use the same method to tie them both down except instead of just going through the bottom boat’s grab handles, thread the strap through both the top kayak’s grab handles as well. By repeating this on the other half of the roof rack you should be able to comfortably get 4 kayaks on the car. One final piece of advice, if you take a look at this post’s thumbnail, that is an example of what can be achieved via commitment, time and plenty of straps – if they can do it, so can you… enjoy.
