
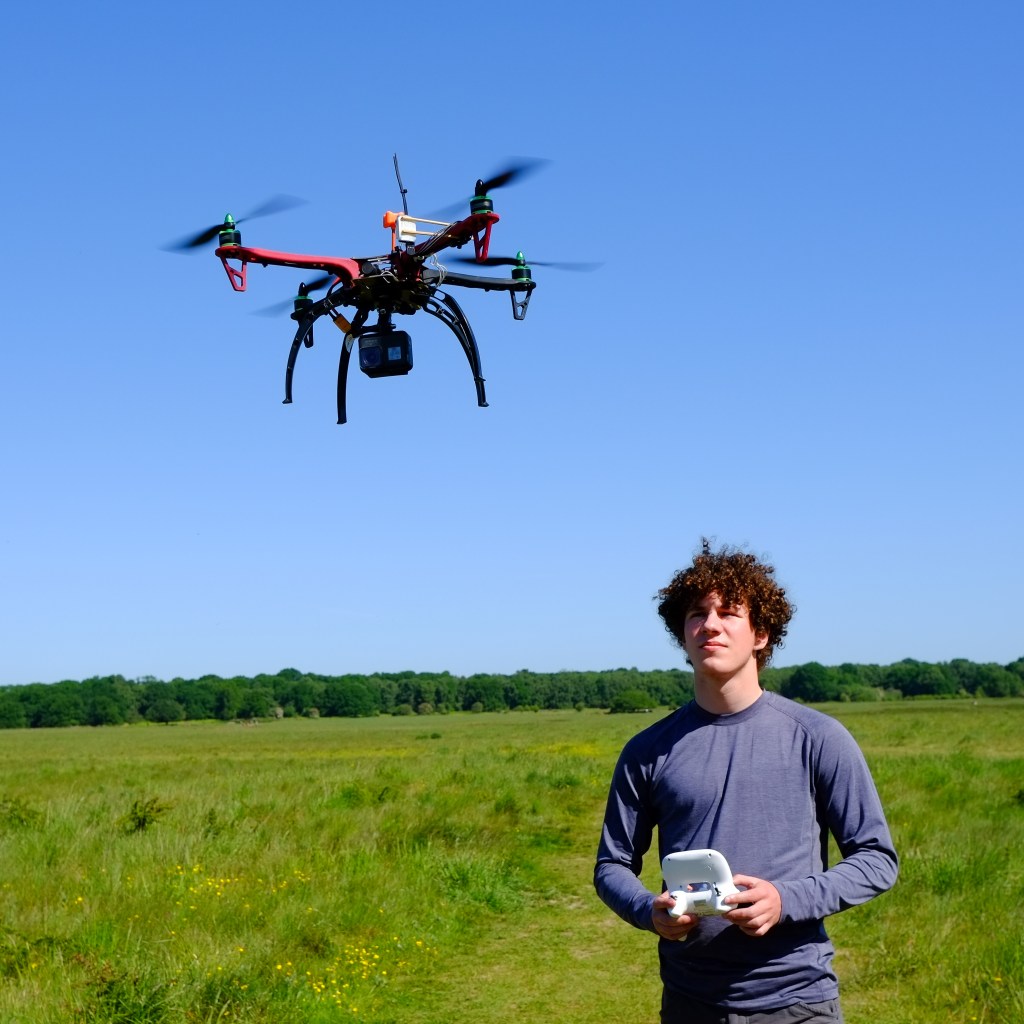
I’ve just finished building my second quadcopter; the first I built about 2 years ago with the intention of using it for drone racing but this new one I meant for videography, specifically to allow me to get those stunning intro and outro clips you see in films or Youtube edits etc. I’ve had a lot of issues including both hardware and software bugs but despite all of it I’m glad I went ahead with the project and once I’ve fully callibrated everything you should expect to see some drone footage on my Instagram and other social media. In this post I’m going to run through the basics of how a quadcopter works (hardware-wise) and will hopefully show you that it’s not as hard as you might think to build a quadcopter capable of outperforming professional pre-built drones but for considerably less money…
What do you need?
- Frame
- Motors + Propellers
- ESCs
- Flight Controller
- FPV Camera
- Video Transmitter
- GPS (optional)
- Gimbal (optional)
- Battery
- Transmitter + receiver
- FPV Goggles
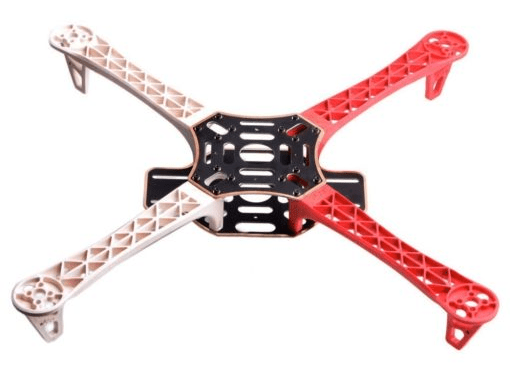
The first thing to choose should be a frame. Frames come in plenty of different shapes and sizes, some are made from carbon fibre and some from plastic or even wood, these variables all effect the overall price of the build. In my case I required a large, strong quadcopter frame (4 arms) which would give me plently of space to mount all my electronics + camera etc and have a big enough diameter to allow large propellers and therefore the necessary lifting power to carry a camera (in my case a GoPro Hero 5 Black). I settled for the F450 Flamewheel frame (with landing gear included) which has tough plastic arms sandwiched between carbon fibre plates; it isn’t particularly light but it’s suprisingly stiff and replacement parts are easily available plus it’s affordable coming in at £20 and means I can run 10 inch props which are the perfect size for carrying a medium sized camera.
Next we need motors and propellers. This is slightly more complicated and requires some individual research if you’re actually intending to make a drone yourself but basically you need to ensure that the motors you use can fit on your frame (they have the correct mounting paterns) and that they have the correct specs to work with propellers for your frame (some are meant for efficiency and some are meant for power). I wanted to use 10 inch props on my frame so I got some carbon fibre infused props which give me a little bit of extra stiffness and are therefore more responsive and efficient; considering they only cost £5-10 you may as well ignore standard all-plastic props. To go with these I got a set of Multistar 2212 920KV motors which are meant to run 10 inch props (£25), they aren’t the most efficient but I figured I’d still like some punch when flying which is why the KV rating is higher than you might expect for a video quadcopter.
Once you’ve chose your propellers you need some Electronic Speed Controllers (ESCs), these control your motor direction and speed. You have to choose an ESC that is rated for the motors you picked – I chose a BLheli 4-in-1 20A ESC (£25). Normally you would have 4 different ESCs, 1 for each motor and they would be attached to each separate arm on your frame, having a 4 in 1 ESC is useful because it is protected on the inside of your frame along with your other internal electronics, it also significantly reduces build time because you only have to solder the power cable for the 1 board rather than 4 separate smaller ones, however if 1 ESC fails you have to replace the whole board rather than just that single ESC.

Onto internal electronics. Essentially the brain of the drone is called the Flight Controller (FC) and it is this that you connect to your computer and program. There are different types of FC by many different brands but you don’t want to get a FC that is below F3. An F3, F4 or F7 board will be fairly recent designs so they will have enough processing power to handle most tasks, I wanted a FC with a barometer and compass built in so that I could use automous GPS flight modes and I decided to get an SPracingF3 EVO (£28) because it had all the features I needed and was similiar to my SPracingF3 that I used on my racing drone. The next item you need is a Power Distribution Board (PDB) which does exactly what it sounds like, your chosen battery (I’ll get to that later) will plug into it and every other component will be powered the PDB. I knew that various components would require different voltages so I got the Matek XT60 PDB because it has a built in 5V and 12V regulator. This allows me to power my camera and VTX…
The camera I use to fly is not my GoPro. I could fly using the GoPro but the video transmission lag would be awful and the range would be reduced so when flying FPV it is better to use a specifically designed camera like the Eachine 1000 TVL CCD (£15). This is powered by the 5V pad on the PDB and is connected to my Video Transmitter (VTX) which transmits the video feed back to my FPV goggles. For this I used an Eachine TX526 (£12) which is powered by the 12V pad on my PDB and has multiple channels to ensure my FPV goggles receive the best signal.

Onto the GPS. The GPS was actually an afterthought because I was unaware of the existence of GPS flight modes, however it was easy to install even after the quadcopter was built. My FC has a barometer and compass built in so all i needed was a straight GPS module. To explain that a bit better – for automous flight modes your quadcopter needs to know where it is in 3D space. A barometer tells it how high up it is, the compass tells it which way its facing and the GPS tells it what its 2D location is. Most GPS modules have a compass built in because the majority of FCs don’t so you need to check that when picking components. I opted for the Beitian bn-220 GPS module (£20) which is small and lightweight so that I could easily add it on without it affecting the flight performance.
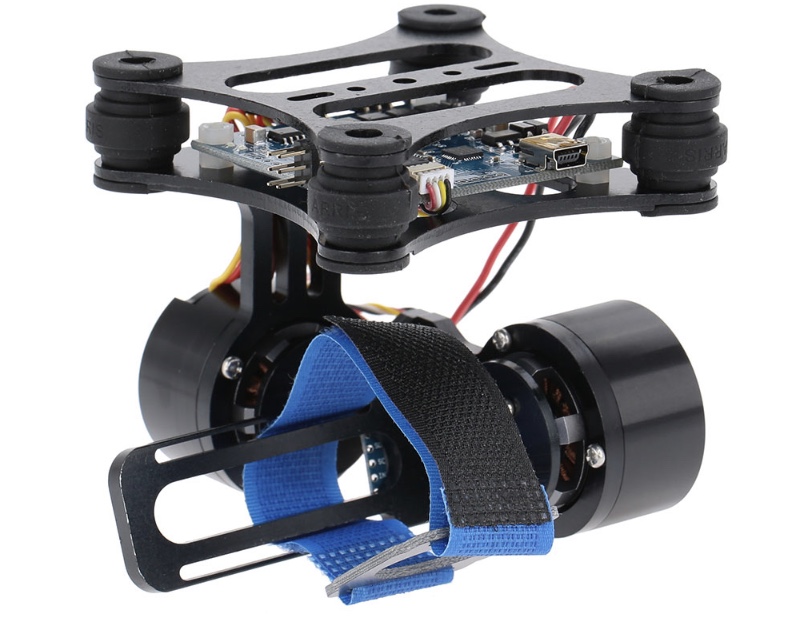
I intially thought that I might not need a gimbal because the video stabilisation on my GoPro is excellent, however I noticed immediately a lot of gelo due to the rolling shutter; the vibrations created by the motors mess up the camera’s sensors. I also realised that a fixed position camera would severely limit my ability to take cinematic footage. There are 2 types of drone gimbal, a 2-axis gimbal or a 3-axis gimbal. The 2-axis gimbal stabilises roll and pitch and the 3-axis gimbal stabilises yaw as well. A 3-axis gimbal is more expensive and heavier (leading to reduced flight times) and I deemed it unecessary so after shopping around on ebay I found a second hand 2-axis carbon fibre gimbal for £35 and it’s worked well so far managing to completely get rid of any gelo affect, stabilise the camera no matter how quickly I change direction and allowing me to adjust camera pitch from the ground using my controller.
That’s actually it for components which are part of the quadcopter but I’ll briefly go over the remaining 3 parts you need to fly. Batteries are difficult to choose and suprisingly expensive but essentially there are 3 things you need to know. Your motors and PDB will require a battery with a certain amount of cells (I need a 3 cell battery) because that will provide a certain voltage (11.1V). The ‘Mah’ spec of your battery is the capacity, the higher it is the longer the flight time however you must ensure that the ‘C’ rating is high enough to meet your needs because generally speaking the larger the capacity the lower the ‘C’ rating. The ‘C’ rating is how much power can be provided continuously and if it isn’t high enough components will draw too much power damaging the battery and potentially themselves. I use the Turnigy Nano-Tech 3 cell 5000 Mah 20C (£30) batteries and they give my quad approximately 20 minutes flying time with the GoPro attached.
You will need a transmitter and receiver to control the drone in flight; I use a Turnigy Evolution transmitter (£50) because it’s very comfortable to hold, it has more than enough switches to control the gimbal and various flight modes, it’s affordable compared to other transmitter options and it comes with it’s own receiver (which you’ll need to solder to the FC as well). Finally FPV goggles are needed to actually view the footage your VTX is putting out. FPV goggles come in all shapes and sizes and can be extremely expensive in some cases but I found that getting a cheaper pair of ‘box’ goggles and buying better antennas to improve range has worked for me. I fly using the Eachine VR006 Mini FPV Goggles (£30), the video quality is more than good enough to display the VTX output at it’s native resolution and the screen is large enough to comfortably view inflight footage, I merely ordered a pair of better directional antennas and a single omni-directional antenna so that my video quality at distance was improved.
That’s it this time, I hope you enjoyed this article. If you would like to see more in the future be sure to subscribe to my blog so that you’re notified when I post next…
